Access to Elasticsearch with Cerebro via SSL+LDAP
One of the main plugins we were using with our 2.x Elasticsearch cluster was KOPF. This plugin was a web interface to the Elasticsearch API and it was an easy way of performing common tasks on our Elasticsearch cluster.
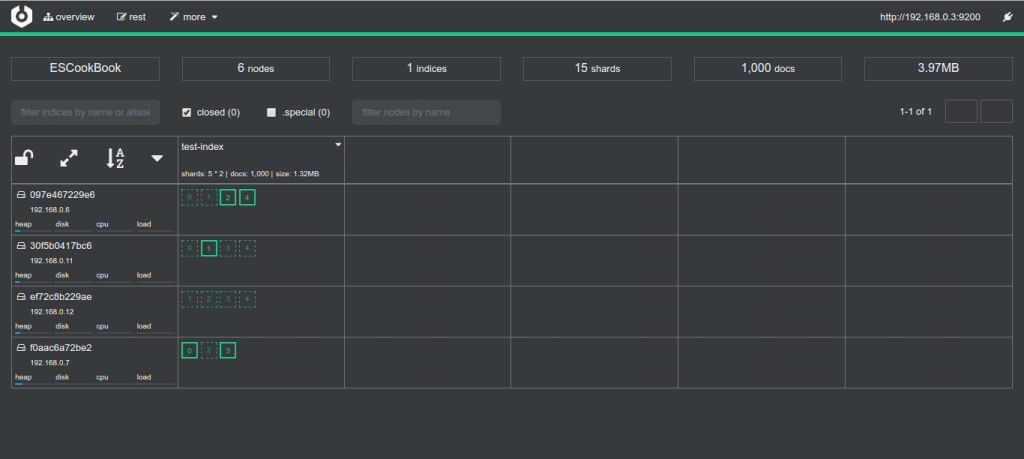
When we upgraded our Elasticsearch cluster to version 5.x, we could not continue using this plugin because it was not longer supported. The good thing was that the author of KOPF, Leonardo Menezes, had a new project called “CEREBRO” to offer an alternative to KOPF when running Elasticsearch 5.x.
“CEREBRO” is an Elasticsearch web admin tool built using Scala, Play Framework, AngularJS and Bootstrap. It is equivalent to KOPF with some extra new features.
“CEREBRO” is easy to install and use but at the moment of writing this article it lacks a number of things to be accessed and administrated in a professional way:
- CEREBRO will start a service on a defined port, being available on this port but without SSL support.
- It has a partial LDAP integration, but we could not make work in our infrastructure. This could be our fault, we did not use time to try to debug this issue.
- It doesn’t have any type of package RPM/DEB to be installed and maintain.
- It doesn’t have any configuration to administrate the service in a easy way.
We use a server with RHEL7 to run CEREBRO and this is what we have done to try to fix all these administrative shortcomings without using so much time. Maybe you will have to adjust some of the steps if you are using another linux distribution:
-
Download the last version of CEREBRO from https://github.com/lmenezes/cerebro and save it under
/opt/cerebro.[root@elastic ~]# ls -l /opt/cerebro/ total 50012 drwxr-xr-x. 6 apache apache 99 Jun 19 16:28 cerebro-0.6.5 lrwxrwxrwx. 1 apache apache 13 May 9 15:52 current -> cerebro-0.6.5 -
Create the CEREBRO configuration file
/opt/cerebro/current/conf/application.confwith this content (you will have to customize some parameters to work in your infrastructure):# Secret will be used to sign session cookies, CSRF tokens and for other encryption utilities. # It is highly recommended to change this value before running cerebro in production. secret = "ki:s:[[@=Ag?QI`W2jMwsdjhhkljqwiuiueqeakjhJHKJASDKJ123kjASTSAHGhghga" # Application base path basePath = "/ # Defaults to RUNNING_PID at the root directory of the app. # To avoid creating a PID file set this value to /dev/null #pidfile.path = "/var/run/cerebro.pid" # Rest request history max size per user rest.history.size = 50 // defaults to 50 if not specified # Path of local database file data.path = "./cerebro.db" # Authentication auth = { } # A list of known hosts hosts = [ { host = "http://elasticsearch-prod.example.org:9200" name = "ES PRODUCTION" } { host = "http://elasticsearch-utv.example.org:9200" name = "ES UTV" } ] -
Install the packages
httpd,mod_sslandjava-1.8.0-openjdk -
Configure SElinux with these commands.
# semanage port -a -t http_port_t -p tcp 9200 # setsebool -P httpd_can_network_connect 1 # setsebool -P nis_enabled 1 -
Create the file
/etc/systemd/system/cerebro.servicewith this content:[Unit] Description=Elasticsearch - Cerebro Wants=network-online.target After=network-online.target [Service] Environment=HOST=127.0.0.1 Environment=PORT=9200 WorkingDirectory=/opt/cerebro/current User=apache Group=apache ExecStart=/opt/cerebro/current/bin/cerebro \ -Dhttp.port=${PORT} \ -Dhttp.address=${HOST} # Connects standard output to /dev/null StandardOutput=null # Connects standard error to journal StandardError=journal # Shutdown delay in seconds, before process is tried to be killed with KILL (if configured) TimeoutStopSec=0 # SIGTERM signal is used to stop the Java process KillSignal=SIGTERM # Java process is never killed SendSIGKILL=no # When a JVM receives a SIGTERM signal it exits with code 143 SuccessExitStatus=143 [Install] WantedBy=multi-user.target ``` -
Run the command
systemctl daemon-reload -
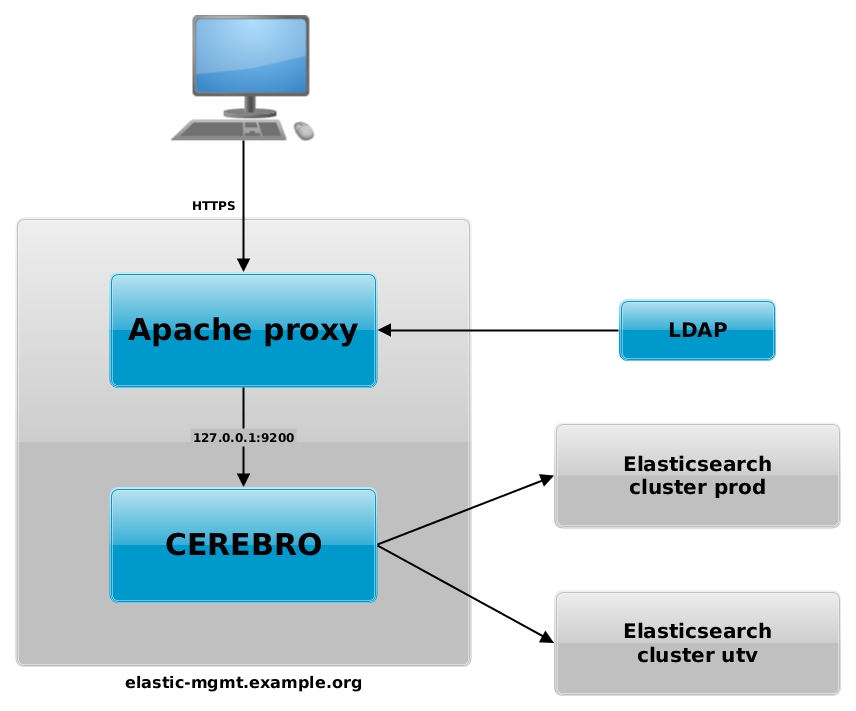
Configure apache as a proxy to handle all access via HTTPS, provide LDAP authentication, and to forward the traffic to the CEREBRO service running on 127.0.0.1:9200. Create the file ‘/etc/httpd/conf.d/elastic-mgmt.conf’ with this content (you will have to customize some parameters to work in your infrastructure):
<virtualhost *:80> ServerName elastic-mgmt.example.org ServerAlias elastic-mgmt RewriteEngine On RewriteCond %{HTTPS} off RewriteRule (.*) https://%{HTTP_HOST}%{REQUEST_URI} </virtualhost> <virtualhost *:443> ServerName elastic-mgmt.example.org ServerAlias elastic-mgmt ProxyRequests Off ProxyPreserveHost On ProxyReceiveBufferSize 4096 <proxy> Order deny,allow Allow from all </proxy> AllowEncodedSlashes On ProxyPass / http://127.0.0.1:9200/ ProxyPassReverse / http://127.0.0.1:9200/ <location /> Order allow,deny Allow from <YOUR_CLIENT_IP> </location> <ifmodule authnz_ldap_module> <locationmatch "/"> AuthType Basic AuthName "Elasticsearch Cerebro [Note: Authenticate with your LDAP-user]" AuthBasicProvider ldap AuthLDAPURL <YOUR_LDAP_URL> TLS AuthLDAPGroupAttribute memberUid AuthLDAPGroupAttributeIsDN off require ldap-group <YOUR_LDAP_GROUP> </locationmatch> </ifmodule> SSLEngine on SSLProtocol -ALL +TLSv1.2 +TLSv1.1 SSLProxyEngine on SSLCipherSuite HIGH:!MEDIUM:!aNULL:!MD5:!RC4:!DES SSLHonorCipherOrder on SSLCertificateFile /etc/pki/tls/certs/elastic-mgmt.example.org.crt SSLCertificateKeyFile /etc/pki/tls/private/elastic-mgmt.example.org.key SSLCACertificateFile /etc/pki/tls/certs/CA.crt BrowserMatch "MSIE [2-5]" \ nokeepalive ssl-unclean-shutdown \ downgrade-1.0 force-response-1.0 </virtualhost> -
Finally run these commands to configure and start the services:
  # systemctl enable cerebro
  # systemctl enable httpd
  # systemctl start cerebro
  # systemctl start httpd
Now you should be able to access CEREBRO via the ServerName you have defined in /etc/httpd/conf.d/elastic-mgmt.conf, in our case: https://elastic-mgmt.example.org/.
A graphical representation of this configuration is available in this diagram:
Remember that you should always run your Elasticsearch cluster in a dedicated network and that the access to this network should be restricted only to servers under your control.
Thanks to Leonardo Menezes for this open source software that give us the opportunity of interacting with the Elasticsearch API in a easy way.
Links: